Extensions Overview
An extension gives the model tools for your systems — read an incident, search logs, list deployments, open a ticket, and so on. This section is for creating extensions; for installing, connecting, and managing them as a user, see Using Extensions.
Two ways to create an extension
- The UI builder (no code) — the Create button on the Extensions page generates a working, read-only connector for any JSON HTTP API in four guided steps. Start here for straightforward "call this endpoint" tools: Create an Extension in the UI.
- Write it yourself (code) — a single Node script speaking MCP over stdio gives you full control: multiple tools, custom logic, non-HTTP backends, exotic auth. Start with Build Your First Extension.
Both produce the same thing — an extension folder with a manifest and an MCP server — so you can begin in the builder and hand-edit the generated code later. The rest of this page explains the architecture behind both; the next pages cover API-key and OAuth authentication and the manifest reference.
What an extension is
An extension is a small program that speaks the Model Context Protocol (MCP). It advertises a set of tools (each with a name, description, and JSON-Schema input) and executes them when the model calls. NeatContext launches your extension, asks it what tools it has, and routes a connected AI client's tool calls to it.
A NeatContext extension is a folder containing:
neatcontext-extension.json— the manifest (id, name, version, how to launch the server, whether it needs a connection). See the manifest reference.- the MCP server — the executable the manifest points at (for example a Node script), plus any files it needs.
You add an extension by pointing NeatContext at that folder. It copies the folder into its own data directory and loads it; enabling the extension makes its tools available to the model.
Transport and protocol
The reference transport is stdio: NeatContext spawns your server as a
subprocess and exchanges Content-Length-framed JSON-RPC 2.0 messages over
stdin/stdout — the same framing used by the Language Server Protocol. Each message
is:
Content-Length: <byte length of JSON>\r\n
\r\n
<JSON-RPC message>
Your server must handle three JSON-RPC methods:
| Method | Purpose |
|---|---|
initialize | Handshake; return your protocol version, capabilities, and server info. |
tools/list | Return the array of tools you expose. |
tools/call | Execute a named tool with the given arguments and return its result. |
Extensions that declare a connection also receive a neatcontext/connection
notification right after initialize, carrying the user's credentials for that
call (see Connections below); connectionless extensions can ignore
it.
NeatContext starts a new server process for each tools/list and each
tools/call, and it lists tools without credentials. Two consequences:
- Stay stateless. Don't cache anything in memory between calls, and never write credentials to disk — they arrive over the handshake each time.
tools/listmust work unauthenticated. Return your tool definitions even when no connection has arrived.
Tool naming: the neatcontext_ prefix is reserved
Tool names from a user (third-party) extension must not start with
neatcontext_. That prefix is reserved for trusted, bundled first-party
extensions; if a user extension exposes a neatcontext_-prefixed tool, that tool is
filtered out. Use your own prefix instead — the
incident demo uses demo_
(demo_get_incident, demo_search_logs, demo_list_deployments). A short, unique
prefix also helps the model disambiguate your tools from others.
Connections
The manifest's connection.kind declares how the extension authenticates. The
split of responsibilities is deliberate:
- NeatContext owns credential custody — collecting secrets from the user
(a form or a browser flow), encrypting them with the OS secure storage,
persisting them, refreshing OAuth tokens, and injecting them into your
server over the
neatcontext/connectionhandshake before each tool call. - Your server owns credential use — it receives plain values and calls its backend however that backend needs (headers, token exchange, signing, …). Custom authentication schemes live in your server code, not in NeatContext.
Each kind produces a different Connect experience on the Extensions page:
connection.kind | The user sees | Example |
|---|---|---|
none | No connection UI at all — enable and go. | A connector for local or unauthenticated systems (first-extension guide) |
api_key / bearer | An inline form on the extension card, generated from the fields you declare (password inputs for secrets, "(optional)" labels, placeholders). Connect validates required fields and stores them encrypted. | The bundled Datadog extension (API-key guide) |
oauth2_pkce | A Connect button that opens the system browser to the provider's consent page; NeatContext catches the localhost redirect, exchanges the code, and stores/refreshes tokens automatically. | The bundled PagerDuty extension (OAuth guide) |
What the user sees for the two authenticated kinds:
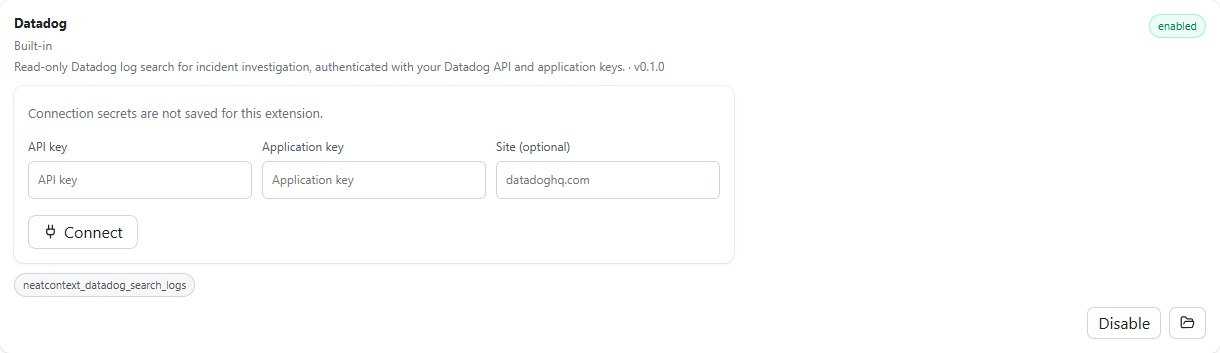

Whatever the kind, your server receives the same handshake payload shape —
{ kind, values, config } — so switching or adding auth never changes your tool
code's structure. If your backend uses something more exotic (session login,
request signing, Kerberos), declare an api_key form for the raw inputs and do
the exotic part inside your server.
When credentials are missing or rejected
If the user hasn't connected, no handshake arrives — your tools should then return a connection-required result instead of failing:
{ "error": "myservice_not_connected", "connection_required": true,
  "provider": "myservice", "message": "Connect MyService before searching logs." }
The connected AI client relays your message — a "connect it first" prompt — instead
of guessing; connect the extension in NeatContext and the next call works. Rejected credentials
("error": "myservice_access_denied", optionally with connection_required: true)
behave the same. Ordinary failures (bad query, timeout) should not set these
fields — the model can then correct itself and retry. The exact contract is in the
manifest reference.
Security model
- Extensions run on your machine, as a subprocess you added. Treat a third-party extension like any other code you run locally — review it first.
- An extension can reach whatever the host machine can. Prefer read-only tools for investigative connectors, and make any write/destructive tool explicit and narrowly scoped.
- Keep secrets out of the manifest, out of tool arguments, and out of the extension folder. For the user's credentials, declare a connection — NeatContext stores them encrypted and injects them per call. Environment variables remain fine for non-secret deployment settings (endpoints, ports).
Reference implementations you already have
NeatContext ships two first-party extensions authored through exactly the same
contract you use — each is a single self-contained server.cjs with a manifest,
no NeatContext internals:
- PagerDuty —
oauth2_pkceconnection, three read-only incident tools (usage guide: Using the PagerDuty Extension). - Datadog —
api_keyconnection (API key + application key + optional site), one log-search tool (usage guide: Using the Datadog Extension).
On the Extensions page, click the folder icon on either card to open its folder and read the source. They are the best starting templates.
Next
- Create an Extension in the UI — the four-step no-code builder, field by field.
- Build Your First Extension — a complete, annotated stdio MCP connector with no authentication.
- API-Key Extensions — add a credentials form (Datadog-style).
- OAuth Extensions — connect through the provider's sign-in page (PagerDuty-style).
- Manifest Reference — every field in
neatcontext-extension.json, the handshake payload, and the terminal-result contract.